Category Archives: Uncategorized

The Bakers Assistant IDE Plugin

The Bakers Assistant is a LiveCode IDE plugin for working on applications built using the Levure framework. The first version of the plugin provides an interface for browsing the UI, template, libraries, frontscripts, backscripts, behaviors, and helpers used by your application.

You will be able to navigate your application more quickly using the Bakers Assistant than you can using the Project Browser as it doesn’t show every stack that is currently open in the IDE.

Screencast

Watch the following screencast to see an overview of how it works.

Download

https://github.com/trevordevore/bakers-assistant

Share

Building customized scrolling lists on top of the DataView control

Recently I announced that the source code for the DataView control was now available for LiveCode developers. A developer feeds a DataView rows of data from a variety of data sources. The DataView then displays those rows using templates (groups on a card) specified by a developer.

The DataView is a custom control made up of a group, some child controls of that group, and various behaviors scripts. The custom group is placed on a card wherever a DataView will be used. Out of the box a DataView doesn’t do much without some configuration. It has no default UI for rows and it doesn’t favor one data source over another. The developer must define the row template(s) to use and provide data for a specific row when the DataView asks for it.

Rather than being a control that is really easy to use but is very limited, the DataView is a control that can be customized for a variety of different needs. It serves as the foundation for any number of customized controls. For example, the DataView Demo application provides a a few examples of data being displayed with a DataView. As of this writing there are five examples:

  • List extensions installed in the IDE.
  • Create a file browser from a folder of your choosing.
  • Browse the stacks open in the IDE.
  • List FontAwesome fonts along with icons taken from a SQLite database.
  • List movies found in a SQLite database.

In addition to the customized UI that each example uses, a couple of different data sources are used:

  • Arrays built from functions, folder listings, and open stacks.
  • Database cursors.

In the demo application the ability to assign a database cursor or an array to the DataViews is provided by behaviors that inherit the base DataView behavior and are assigned to the DataView group control. These behaviors control the flow of data from a data source to the DataView behavior. The DataView comes with one behavior that allows a developer to assign a numerically indexed array to the dvData property of a DataView (array_controller_behavior.livecodescript). The DataView Database Cursor behavior, a separate download, adds a dvCursor property. A developer can assign the result of a call to revQueryDatabase to the property and the DataView will automatically scroll through the results. There is also the DataView Tree behavior that adds a dvTree property for displaying tree structures in a DataView. The File Browser and Stack Browser examples are built on top of it.

While these behaviors that add a dvData, dvCursor, or dvTree property are helpful, they still don’t provide templates that dictate what each row will look like. But it is possible to distribute very specialized controls that are built on top of a DataView. These specialized controls can focus on providing a very specific feature to an application. For example, a File Browser control could be distributed which contained the necessary behavior and row templates for browsing the file system. The developer using the control might only need to specify some colors to use for folder and file icons and assign the dvRootFolder property in order to have a working file browser in their application.

A similar control could be made for a generic tree browser. For many use cases the ability to specify an icon, label, and colors, along with the necessary event messages to respond to user actions, would be adequate for a developer to add a tree UI to his or her application.

This modular approach to building on top of DataViews is greatly simplified because the DataView is packaged up as a Levure Helper. A Helper in the Levure Framework is a means of adding complex functionality to a Levure application by simply dropping a folder into the Levure application project folder. The folder contains a configuration file (helper.yml) that tells Levure how to use the files within the folder. For example, the DataView helper folder contains seven script files and a stack with a sample DataView control. Six of the scripts serve as behaviors while the other script is used as a frontscript.

If we consider the File Browser example within the context of a Levure Helper then distributing the control becomes much simpler. The developer creates a behavior script which extends the DataView behavior along with any row templates (groups on a card) that the File Browser needs. Those files are placed in a single folder along with the helper.yml file. The developer who wants to use the control adds the DataView helper folder and the File Browser helper folder to the ./helper folder of a Levure application. After that all of the code required to make the control work is available.

Going forward I hope to see other developers build specialized controls with beautiful UIs on top of the DataView.

The DataView control has been tested on macOS, Windows, and iOS in LiveCode 8 and 9.

Share

Using the livecode standalone engine to run script only stacks on a server

Years ago I set up a license key generator on our server to generate license keys for our products. I used a revolution standalone engine and a plain text LiveCode script that was processed using the engine. Recently, a server upgrade removed a file that was necessary for the old revolution engine to function so I was forced to update my setup. Below is a description of the solution I came up with after a few hours of trial and error.

LiveCode Community Standalone Engine

To process my plain text LiveCode script files I installed the 64-bit version of the community version of the Linux standalone engine on my server. I grabbed the file named Standalone from the Tools/Runtime/Linux/x86-64 folder of a LiveCode Community installation. I renamed the file to <code> on my server and made it executable (e.g. chmod 755).

Note that you need to use the community version as it doesn’t need to be licensed. If you grab the Standalone engine from an Indy or Business installation the engine won’t run because it is unlicensed. Licensing occurs when you build a standalone in LiveCode.

The Script

For the script I created a Script Only Stack which looks like this:

script "clarifykeygenerator"

on startup
   put generateKey(the commandArguments)
   quit
end startup

function generateKey pParams
   ...
   return tKey
end generateKey

The script generates the key, outputs it to STDOUT, and then quits. That’s it.

You can now test this setup on the command line. Assuming the lc-standalone-v8 engine and a keygenerator.livecode script are in the same directory the following call would work:

./lc-standalone-v8 -ui keygenerator.livecode theLicenseCount theLicenseName

Note that when processing parameters in your script, -ui and keygenerator.livecode would be the first two parameters. Actual parameters that your script is interested in processing would start with parameter number 3 in the commandArguments.

Calling The License Generator From PHP

The final thing I had to do was call the license generator from PHP. You can do that using the exec() function. Below is some sample code. Note that I am base64 encoding the name. If the name for the license has accented characters in it then PHP will throw an error if you try to include it in the exec() function. Just make sure you call base64decode in your LiveCode script that generates the license key.

$license_generator = '/usr/home/name/public_html/cgi-bin/';

$execStr = $license_generator . 'lc-standalone-v8 -ui ' . $license_generator .         'keygenerator.livecode ' . 
        escapeshellarg($license_count) . ' ' . 
        escapeshellarg(base64_encode($name));

$key = exec($execStr, $output, $return_var);
Share

Accounting for new widget properties in an OnLoad handler

When writing a LIveCode widget the OnLoad handler is used to populate variables in the current instance of the widget with values that were stored with the widget. Version 1 of an OnLoad handler looks something like this:

public handler OnLoad(in pProperties as Array)
   put pProperties["text"] into mText
   put stringToColor(pProperties["text color"]) into mTextColor
   put stringToColor(pProperties["button color"]) into mButtonColor
end handler

Now assume that you released this widget and there are stacks using it. You then decide that you want to add some more properties to the widget. You make the necessary changes to your OnLoad handler so that version 1.0.1 looks like this:

public handler OnLoad(in pProperties as Array)
   put pProperties["text"] into mText
   put stringToColor(pProperties["text color"]) into mTextColor
   put stringToColor(pProperties["button color"]) into mButtonColor

   // New properties added in version 1.0.1
   put stringToColor(pProperties["border color"]) into mBorderColor
   put pProperties["stroke width"] into mStrokeWidth
end handler

You compile the widget and then launch your project. When your existing widgets are displayed on the screen they aren’t rendered. All you see is an empty area. You try to check the properties in the property inspector but no properties are set. What is going on?

Since your widgets created with version 1 of your widget they didn’t store any properties named “border color” or “stroke width”. When you try to access a key of the pProperties array that doesn’t exist LCB is unhappy and refuses to go on.

There is an easy fix, however. Whenever you release a new version of your widget with new properties you need to add a check to make sure the new properties are keys in the pProperties array.

public handler OnLoad(in pProperties as Array)
   put pProperties["text"] into mText
   put stringToColor(pProperties["text color"]) into mTextColor
   put stringToColor(pProperties["button color"]) into mButtonColor

   // New properties added in version 1.0.1
   if "border color" is among the keys of pProperties then
      put stringToColor(pProperties["border color"]) into mBorderColor
      put pProperties["stroke width"] into mStrokeWidth
   end if
end handler

Since I added “border color” and “stroke width” in version 1.0.1 I just check for the presence of one of the keys. If one of the keys is present then the other will be present as well.

With this change to the code, your existing widgets will still load when running with version 1.0.1 of your widget.

Share

RunRev MegaBundle: Get $4000 of software for $499

RunRev is offering their MegaBundle sale again this year. This is your best chance to get all of the tools you need for a great price.

RunRev MegaBundle 09

If you just need to renew your revEnterprise license or have been looking at developing software with Revolution this is the best price you are going to get.

All of our products that are available through RevSelect are included with the bundle: SQL Yoga, Professional Application Development with Revolution training courses and ScreenSteps standard.

http://www.runrev.com/products/mega-bundle-09/

Share

SQL Yoga Log Plugin

UPDATE: This plugin has been replaced by the plugin that comes with the SQL Yoga distribution.

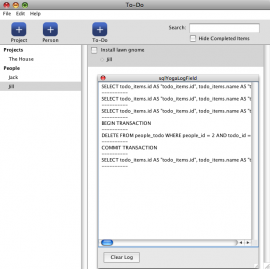
SQL Yoga automatically generates SQL for you so you don’t have to worry about it. Sometimes, however, it can be helpful to see the SQL that is being generated. Database objects have a couple of properties that can automatically log all generated SQL to a field or file.

The SQL Yoga Log Field plugin is simply a stack that registers a field as the field to log all statements to. When you want to see the SQL being generated by the default Database object simply open it from the plugins menu. When you are done just close it and all logging will stop.

Download: http://bluemangolearning.com/download/revolution/plugins/SqlYogaLogField.zip

SQL Yoga Log Field Plugin

Share