On March 12th Kevin Miller announced the first LiveCode 8 developer preview at the LiveCode Unconference in Brooklyn. At the heart of the announcement was the introduction of widgets, a new control available to LiveCode developers. Thanks to the LiveCode Github respository, I had been using LiveCode 8 in the weeks leading up to the announcement. As LiveCode engineers made improvements I would update my local repository, rebuild using Xcode, and test. I was so impressed with what I saw that I decided to move a project I’ve been working on for the last few months to version 8 right away. Why would I trust my project to a LiveCode engine that hadn’t even reached a public beta yet? Let’s take a look.
The control you always wanted
I’ve been using LiveCode for over 12 years now. LiveCode has a lot of good things going for it, but creating controls that are customized for a specific project has never been one of them. Take, for example, the need to create a rectangle graphic that shows the border on the right side and bottom side of the graphic. In addition, the right border should be a different color than the bottom border. Prior to LiveCode 8 you had to use multiple graphics in order to achieve this look. The built-in rectangle graphic only allows you to turn borders on or off for the entire graphic, and you can only set the color of the border as a whole. With LiveCode 8 I was able to code a widget that did exactly what I needed. Take a look:
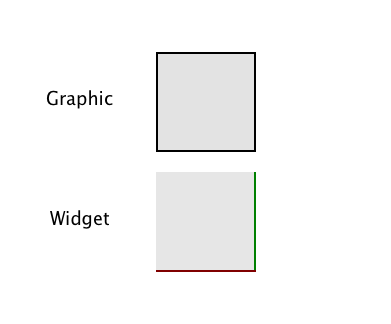
The way I designed my rectangle widget, I can change properties for each side. For example:
set the showLeftBorder of widget 1 to false
set the rightBorderColor of widget 1 to "128,0,0"
Using widgets I have been able to create the custom controls I need for my project. Here are some samples:
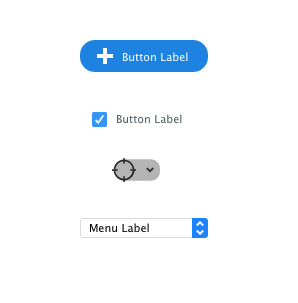
I have a button whose icon I can change using SVG path data. A checkbox that has the look and feel of my application. A hybrid button/menu control that sends different messages based on where you click. And a custom option menu that has the look and feel of my application. Each of these controls is a single control in LiveCode 8. It is not a number of built-in LiveCode controls grouped together. The controls are easy to work with in the project browser and when I update the source code for the widget every single instance of the widget gets updated in my application.
What’s the secret?
The beauty of a widget in LiveCode 8 is that you, the developer, control what gets drawn to the screen. LiveCode 8 adds a new language named LiveCode Builder which allows developers to access (among other things) the Skia drawing libraries that LiveCode uses. We can draw any shapes we want on the widget canvas. Take a look at the OnPaint() handler for a color swatch widget I made last night. It uses rounded rectangles, an SVG path, and clipping to create a control that was a real pain to create previously.
public handler OnPaint() returns nothing
 //////////
 // Draw checkbox background
 variable tPath as Path
 variable tRect as Rectangle

 set the paint of this canvas to solid paint with getColor("background")

 put my bounds into tRect
 put rounded rectangle path of tRect with radius mBoxCornerRadius into tPath
 fill tPath on this canvas

 // Draw color swatch
 set the paint of this canvas to solid paint with getColor("color")
 put rounded rectangle path of rectangle [0,0,the width of my bounds*0.75,the height of my bounds*0.75] with radius 1 into tPath
 // 0 out
 translate tPath by [- the x of the bounding box of tPath, - the y of the bounding box of tPath]
 // Center
 translate tPath by [the width of my bounds/2 - (the width of the bounding box of tPath)/2, \
 the height of my bounds/2 - (the height of the bounding box of tPath)/2]
 fill tPath on this canvas

 // Draw triangle box
 variable tSwatchRect as Rectangle
 put the bounding box of tPath into tSwatchRect

 set the paint of this canvas to solid paint with getColor("background")
 put rounded rectangle path of rectangle [0,0,the width of my bounds*0.458,the height of my bounds*0.5] with radius mBoxCornerRadius into tPath
 // 0 out
 translate tPath by [- the x of the bounding box of tPath, - the y of the bounding box of tPath]
 // Position
 translate tPath by [the width of my bounds - the width of the bounding box of tPath, \
 the height of my bounds - the height of the bounding box of tPath]

 save state of this canvas
 clip to tSwatchRect on this canvas
 fill tPath on this canvas
 restore state of this canvas

 set the paint of this canvas to solid paint with getColor("triangle")

 // Draw triangle
 put path mTrianglePath into tPath
 transform tPath by scaleAndMaintainAspectRatioTransform(the bounding box of tPath, \
 rectangle [0,0,the width of my bounds*0.208,the height of my bounds*0.208])
 translate tPath by [- the x of the bounding box of tPath, - the y of the bounding box of tPath]
 translate tPath by [the right of tSwatchRect-the width of the bounding box of tPath, \
 the bottom of tSwatchRect-1-the height of the bounding box of tPath]
 fill tPath on this canvas
end handler
Here is the result:

Going forward
Widgets in LiveCode 8 dp-1 are still in their infancy but already they allow us to create custom controls that make our products look and behave better. Given that LiveCode 8 is essentially widgets (and libraries, but that is a topic for another post) built on top of the LiveCode 7 engine I was able to move my existing LiveCode 7 project into LiveCode 8 and now add widgets where it makes sense. I’m like a kid in a candy store.

Brilliant. I need a color picker for the property inspector 😉 Thanks for sharing.
Pingback: Creating a Busy Indicator in LiveCode Builder | LiveCode for Developers